How To Make a Faux Topiary that Looks Real
I absolutely love topiaries!!! I prefer real topiaries, but don’t have much luck keeping them alive inside the house. Let me show you how to make a faux topiary that looks real in case you struggle with them too.

This post contains affiliate links which means if you purchase something, I make a small commission at no additional cost to you. Thank you for supporting my blog. You can read my full disclosure policy here.
Do you also love topiaries but struggle growing live ones?
I actually kind of have a “green thumb”, but not with real topiaries inside my home.
It’s not uncommon for store bought artificial topiaries to range from $50 – $200!!
If you don’t want the high price tag of purchasing realistic looking faux topiaries
you’re in luck, because I have the perfect DIY that looks like the real thing!
I have to be honest. I don’t typically like any kind of faux plants or fake flowers and always prefer the look of real plants.
However, in this situation, if you use stems with realistic leaves it’s a great way to have your topiary look like the real deal.
supplies for faux topiary

For your DIY topiary trees, you will need:
* A flower pot or clay pot to hold your topiary
* A stick or dowel rod cut to the height you want your topiary – be sure and cut the length you want plus the height of the pot, because the stick will be inserted into the stirofoam all the way to the bottom of the pot.
For example, if you want your topiary to be 12″ tall and your pot is 7″ tall, you want to cut your stick 19″ long. 7″ will be inserted through the stirofoam all the way to the base of the flower pot, then you will have 12″ exposed for the height of your topiary.
I like to use a real stick from my yard. I feel like the real sticks immediately give the topiary a more realistic look. Plus, it’s free!!
* 1-2 stems faux greenery (depending on how full you want your topiary and how big the stems are)
I found some of mine at Hobby Lobby when they were 50% off.
* stirofoam or floral foam to fit inside your flower pot – sometimes you can find this at the dollar store to cut down on cost
* floral tape
* preserved moss or Spanish moss
* hot glue gun
* wire cutters or scissors
directions for faux topiary


The first step is to cut a piece of stirofoam to fit your container. You will want this as snug as possible.
Place the stirofoam inside your container, making sure it is just below the top edge of the pot. You won’t want that to show.
You can add a bit of hot glue around it to make sure it stays secure.


Next, insert your stick or dowel rod in the center of the stirofoam and push it all the way to the base of the pot. This just adds more stability.
I also like to add a bit of hot glue around the stick where it inserts into the stirofoam.

If you are using a stem of faux greenery that is fairly dense foliage you can cut the stem into 2 pieces.
If your stem is a bit smaller or the greenery is somewhat airy, you might want to use 2 stems to make the topiary full.
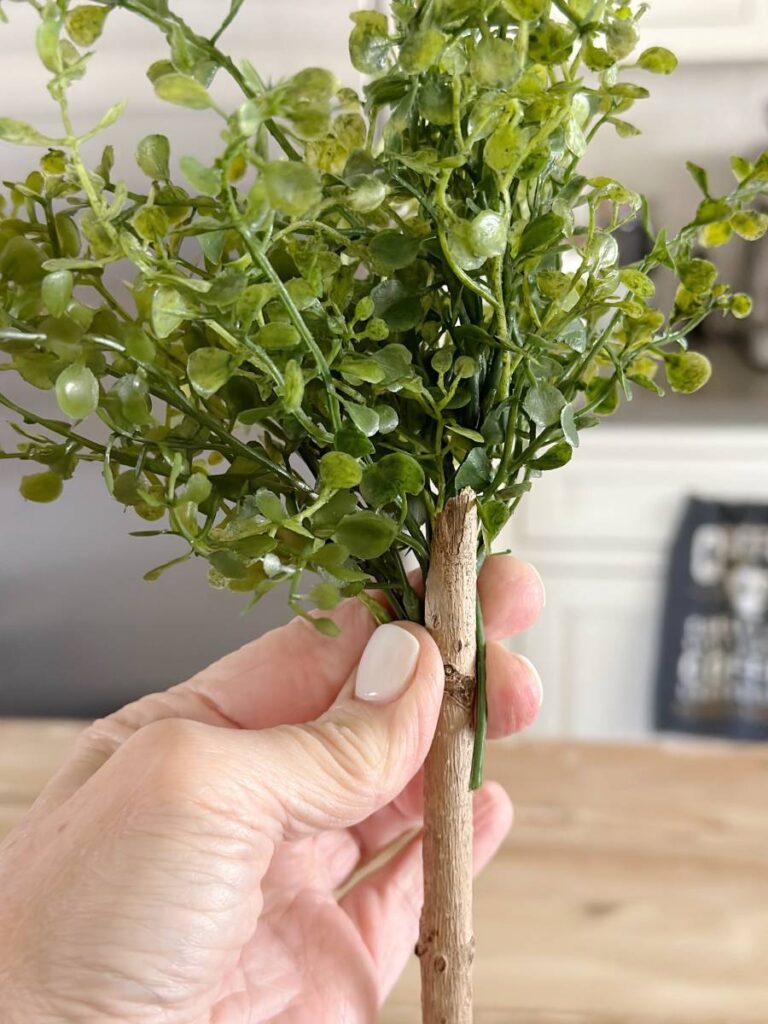


You will place a stem of the greenery at the top of the stick/dowel on one side.
Using your floral tape, wrap around the stem and stick/dowel several times to secure them together.
Next, add another stem of greenery to the other side of the top of the stick and secure the same way.
You can, of course, add more greenery stems in between those 2, if you want a more full topiary.
Be sure and look at all sides of the topiary, as you work, to make sure it is looking even all the way around.
You can always use your scissors and trim up any stray pieces.

Since the floral tape isn’t very attractive and would make it obvious your topiary isn’t real, we want to cover that up.
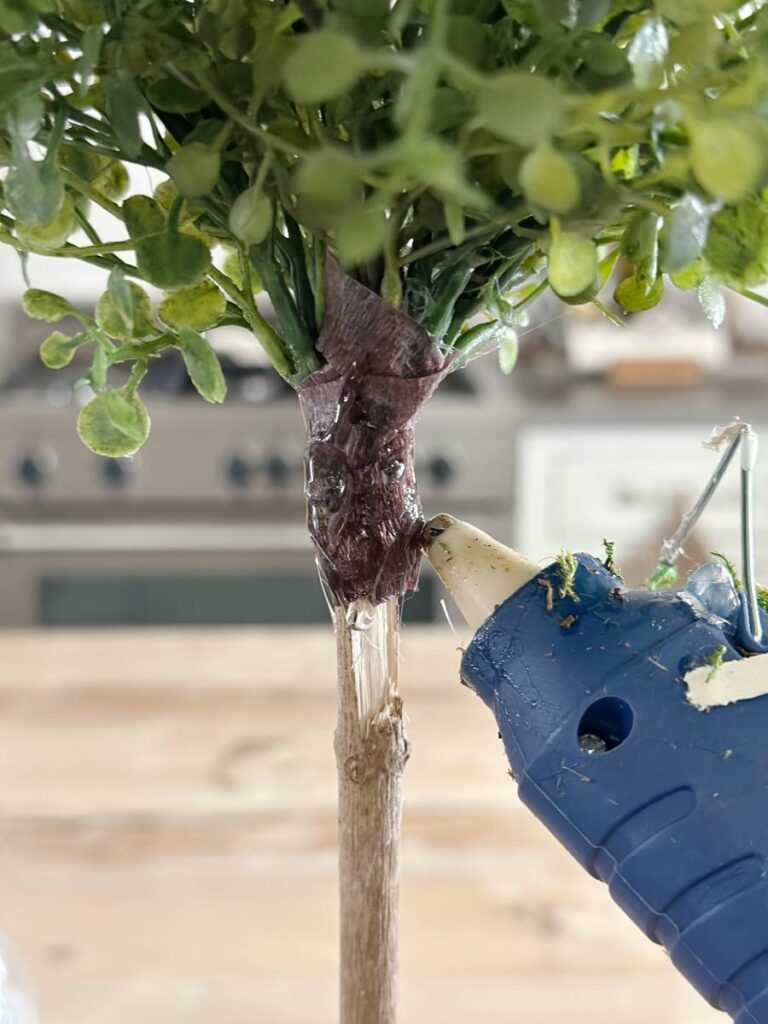


Put a dab of hot glue over the floral tape and attach a small amount of preserved moss. Just enough to cover the floral tape all the way around.
Now, you will want to cover that stirofoam.
You can use real dirt if you really want a realistic potted topiary look.


Or, you can add a layer of the moss on top of the stirofoam and hot glue in place.
I had some dried angel hair vine on hand and decided to add just a touch of that around the base of my topiary along with the moss.
This is certainly not necessary, I just already had some and thought it added a little something different to this topiary.

And that’s it!!
Super easy and inexpensive.
other DIY topiary ideas
Use this “how to make a faux topiary that looks real” instruction to make a large DIY topiary for front porch.
And did you see my post about how to make a topiary with live boxwood cuttings??

Be sure and subscribe to receive emails with more DIY’s and home decor ideas.
I actually used live boxwood cuttings, then they dry naturally. This was a super easy and very inexpensive project since you are using real greenery you can cut from your yard or a neighbors yard.

This is one of those DIY projects you may get addicted to.
It would make such a great gift for someone, so you’ll have a reason to make lots of them.
how to display your faux topiary trees
Wouldn’t a collection of different sizes and variations of greenery look amazing?
One of my favorite ways to display my topiaries is in a grouping.
I like to display a collection of them on top of the china hutch in my breakfast area.

And also on a side table in my sitting area.

There are some smaller topiaries mixed in with some in larger pot topiaries. I also like to use different types of greenery to have a variety of topiary looks.
You will want to also vary the heights of your topiaries to create visual interest.
Cut different lengths of sticks and try to use different types of sticks.


If you are the unfortunate owner of a live topiary that didn’t make it, hold on before you throw out that dead plant.
Cut the dead greenery off and use the existing stick that is already potted.
This will certainly make your plant look more realistic, and also save some money on supplies.
A collection of different topiaries would also be a beautiful mantel display.
Artificial topiary trees can make such a beautiful statement in your home decor.
And if you’re lucky enough to be able to grow real ones inside your home, you can mix them together in your display.
The best part is when you combine the live plants with some of the artificial plants, they will blend together, and you don’t notice the difference.
A single topiary is the perfect addition to a grouping on your living room coffee table. Add a stack of books and another home decor item or perhaps a candle and you have a beautiful display.

I hope you enjoyed seeing how to make a faux topiary that looks real!
If you try it, I would love to know. I love hearing from you!
blessings,

If you enjoyed this post, be sure and Pin It to remember it….

shop the post

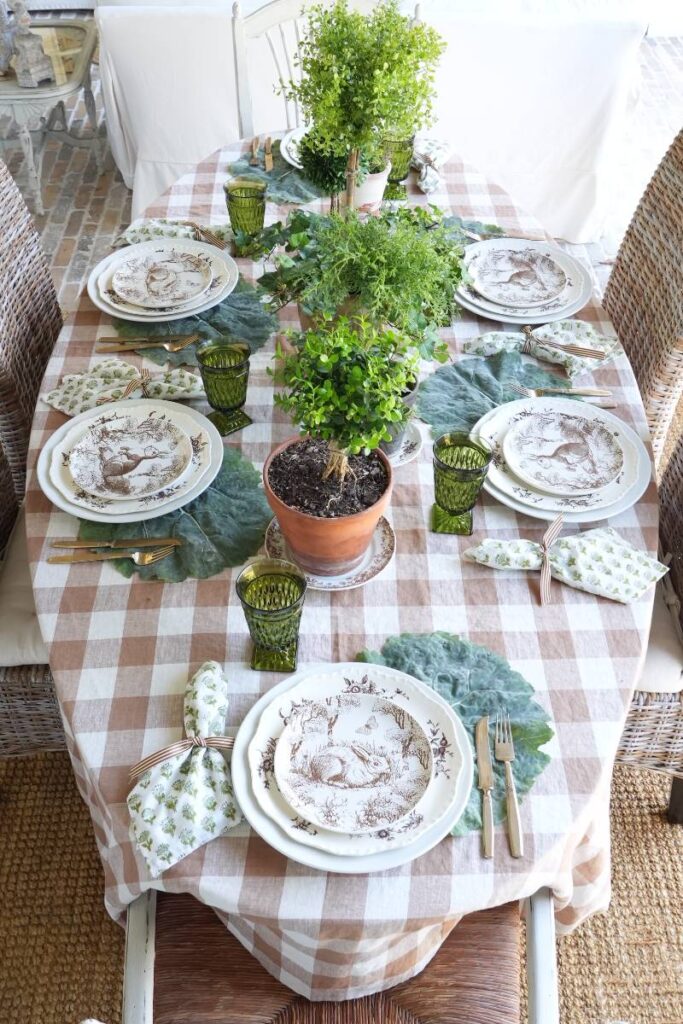
You might also like this Spring Table Setting with a DIY Topiary Centerpiece.
I love topiaries too! Both the fresh and faux are lovely! Love these projects!
Thanks so much Lesa! I’m so glad you liked it!
Topiaries are one of my favorite items to decorate with! Always looking for new ways to make them. Yours look amazing! Thanks for the inspiration! Pinning now!
So glad you like it Donna! Thanks so much!
Your topiaries are lovely. I love topiaries inside, but I have two black thumbs and cannot seem to keep anything alive inside. Great how to, I may try my own. Your photos are always so perfect, thank you for sharing!
Thanks so much for the kind words Cara! I hope you will give it a try. I think you would enjoy having them.
Something I would actually try and do. Thanks for the inspiration.
Oh, I’m so glad you found inspiration with this. They really are so easy to make and I would love to hear if you try it.
I loved this post, Michele. I’m going to share your Topiary ideas in an upcoming post this Saturday. Thanks for the inspiration!
Oh, thanks so much Ann! I’m so glad you liked it and I really appreciate the share. Have a wonderful weekend!
These are beautiful and so real looking. Do you happen to offer these for purchase?
I can certainly make one to sell, but if you are not local, it would be hard to ship.